
Notenity support.
Step by step.
A place to write, doodle and dream. Make your first little notebook with real iPhone screens and a helping hand at every step.
Follow along with the fictional Weekend garden notebook, or use your own ideas. Screenshots show Notenity on iPhone. Controls may look different on iPad or in another app version.
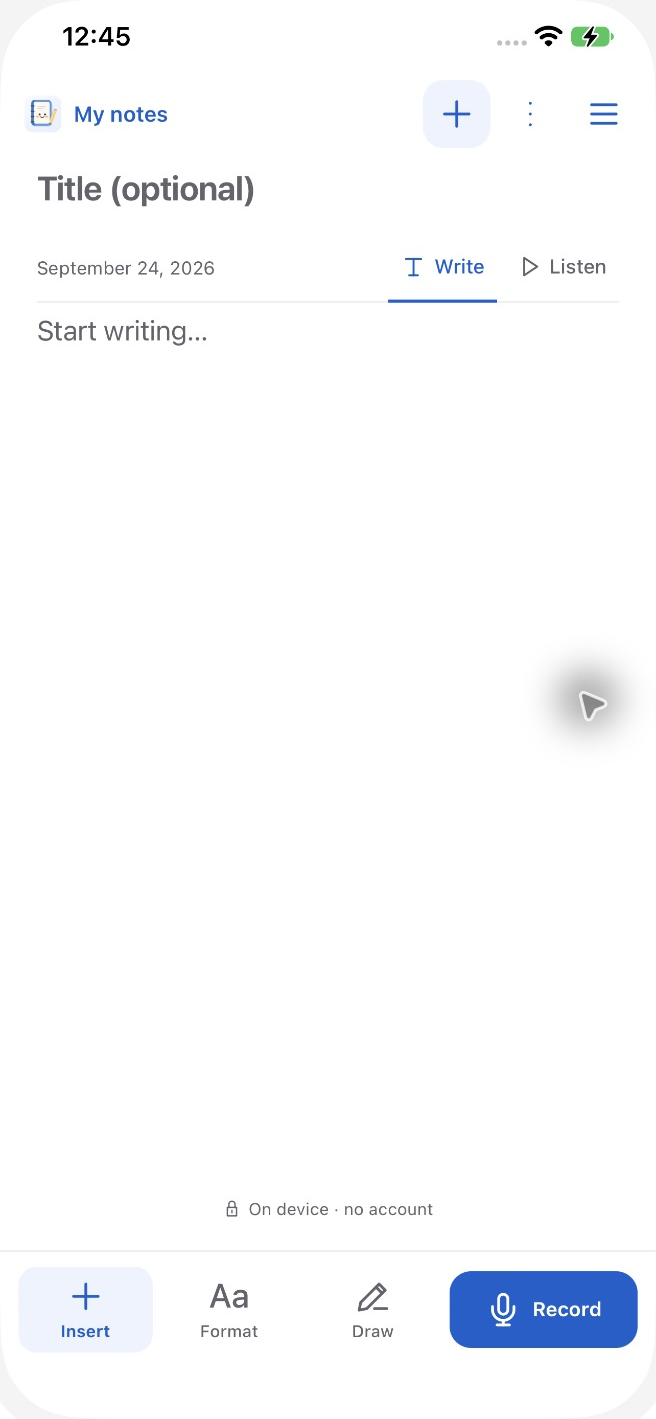
Start a fresh note
Try this
Open Notenity. Tap + beside My notes to create a separate note.
Good to know
Your notebook brings writing, drawing and recording together. Start with a separate note for each project.
Use the left and right arrow keys to move between steps.
Every screenshot,
in one place.
Choose a screen to see which buttons to tap and what to do next. Open any screenshot for a closer look.
Prefer to read
at your own pace?
Open a chapter for all its instructions together. These guides also work with JavaScript turned off.
Start and write
- Start a fresh note
Open Notenity. Tap + beside My notes to create a separate note.
Your notebook brings writing, drawing and recording together. Start with a separate note for each project.
View screenshot 1 ↗ - Give your idea a home
Enter Weekend garden as the title, then write a short project description. Tap the keyboard tick to finish.
Give your note a useful title and start writing. Changes save automatically on this device.
View screenshot 2 ↗ - Open the formatting panel
Tap Format. Select existing text first if you want to change only that text.
Choose bold, italic, underline, text colour, size, lists and alignment in the formatting panel.
View screenshot 3 ↗ - See the active style
Tap B to turn bold on. Tap it again to turn it off. Finish with Done.
A highlighted formatting button shows the active style. Use Done to close the panel and return to your note.
View screenshot 4 ↗ - Choose a text colour
Tap the A colour control to open Colors. Choose a colour, then close the picker.
Use the system colour picker for headings and highlights. Keep strong contrast so your note stays easy to read.
View screenshot 5 ↗ - Add more to the page
Tap Insert to choose a table, checklist, photo, file, drawing or another item.
Insert gathers the items you can add to your notebook. Scroll down for reminders and calendar options.
View screenshot 6 ↗ - Explore the rest of Insert
Scroll down in Insert.
Insert also includes date and time, dividers, reminders, optional live transcription and calendar events. Choose the feature you need.
View screenshot 7 ↗
Tables and checklists
- Choose your table size
Choose 3 rows and 2 columns, then tap Insert table.
Use the grid or the number fields to choose the size of your table.
View screenshot 8 ↗ - Fill the cells
Tap each cell and enter a plant name or care note.
Tables keep related details together. Tap a cell to write, then use Table tools when you need to change the structure.
View screenshot 9 ↗ - Use table tools
Tap Table tools to add rows or columns, select cells, merge or split cells, or adjust the table.
Table tools acts on your current cell or selection. For this example, choose Row below to add another plant.
View screenshot 10 ↗ - Add another row
Enter Rosemary and Let soil dry in the added row.
Your table can grow with your project. The new row keeps the same two-column layout.
View screenshot 11 ↗ - Create a checklist
Choose Insert → Checklist, then type Buy three herb pots.
Turn a small action into a checklist item so you can track it alongside your notes.
View screenshot 12 ↗ - Mark a task complete
Tap the box beside the item to mark it complete. Tap again to reopen it.
The checked item stays in your note, so you can see what you have finished.
View screenshot 13 ↗
Draw and sketch
- Start drawing
Tap Draw. Choose a pen, colour and width before drawing on the page.
Draw directly over your note. The pen, eraser, colour and width controls stay within reach.
View screenshot 14 ↗ - Sketch an idea
Draw a simple plant sketch beneath the checklist. Tap the tick when finished.
A quick sketch can explain an idea alongside your writing. Tap the tick when you are ready to return to the note.
View screenshot 15 ↗ - Expand drawing tools
Tap the drawing toolbar’s three dots to show additional tools.
The expanded toolbar includes drawing shapes, Pan, selection and more space for your sketch.
View screenshot 16 ↗ - Choose a shape
Open the Pen menu to choose Line, Arrow, Rectangle, Ellipse or Eraser.
Choose a shape when you want a cleaner diagram. Keep Pen selected for freehand marks.
View screenshot 17 ↗ - Bring the page together
Tap the drawing tick to return to the finished note.
Writing, a table, a checklist and a sketch can live together on one page.
View screenshot 18 ↗ - Choose where to draw
Open Insert → Draw.
Draw on the paper, or insert a separate drawing area for a self-contained sketch.
View screenshot 19 ↗ - Use a separate drawing area
Choose Insert → Draw → Insert drawing area. Draw within the outlined area.
A separate drawing area keeps its own pen, eraser, colour, width and Undo controls. Use it for a small sketch inside the note.
View screenshot 20 ↗
Organise your notes
- Open note actions
Tap the three dots at the top of the note.
More options brings together note details, recording, export, tools, Undo and Redo.
View screenshot 21 ↗ - Check the saved status
Choose More → Note info to check the saved status.
Note info shows when the page was created and edited, and confirms that it is saved on this device.
View screenshot 22 ↗ - Add a place label
Enter Garden in Place label, then tap Save label.
Use your own label, such as Home, Office or Garden. Notenity does not need location access for this label.
View screenshot 23 ↗ - Browse My notes
Tap My notes to see saved pages.
Use All, Pinned, Today and Recent to narrow the library. The search field finds a note by its words.
View screenshot 24 ↗ - Keep favourites pinned
Tap the pin beside a note, then choose Pinned.
Pin a note you return to often. The Pinned view keeps it easy to find.
View screenshot 25 ↗ - Find a note quickly
Type garden in the search field, then tap the result.
Search helps you return to a project without scrolling through the whole library.
View screenshot 26 ↗ - Move between days
Tap the date beneath the title to choose a daily page.
Use the date field, Previous day, Next day or Today, then open the day you need. Separate project notes remain in My notes.
View screenshot 27 ↗
Record and transcribe
- Find the main menu
Open the three-line Notebook menu.
The main menu leads to your notes, recording, tools and settings.
View screenshot 28 ↗ - Choose how to record
Open Notebook menu → Record & transcribe. Choose the spoken language, then choose Record audio or Record with live transcript.
Recording can stand on its own, or create live text in short sections. Review transcript text before adding it to your note.
View screenshot 29 ↗ - Match the spoken language
Open Recording language and choose English or Arabic to match the speech.
Choose the language being spoken for the transcription. This setting does not translate your notes.
View screenshot 30 ↗ - Find transcript drafts
Open Transcript drafts from Record & transcribe.
Transcript drafts stay separate from your note until you review them and choose to insert a copy. An empty list means there are no drafts to review.
View screenshot 31 ↗ - Switch to Listen
Choose Listen beside Write.
Listen mode lets you revisit recorded moments linked to text or ink. Record while writing or drawing to create linked moments. Choose Write when you want to edit again.
View screenshot 32 ↗
Writing tools
- Explore Tools
Open Notebook menu → Tools.
Use Tools to work with writing, reminders, note search and exports.
View screenshot 33 ↗ - Work with your words
Choose Writing tools.
Tidy spacing, pick key sentences, find tasks or make a table. These quick tools work with your existing words. AI help is a separate option.
View screenshot 34 ↗ - Review before applying
Tap Pick key sentences and review the proposal. Use Back to leave it unchanged.
Review the original alongside the proposal. Nothing changes until you choose how to apply it; you can insert a copy and keep the original.
View screenshot 35 ↗ - Check AI availability
Open AI help to check device availability.
AI help depends on device, operating-system and language support. If it is unavailable, the quick writing tools can still work with your existing words.
View screenshot 36 ↗ - Find more writing tools
Choose More tools.
Search your notes for answers, find written dates for reminders, or revisit saved originals. Help explains how each tool works.
View screenshot 37 ↗ - Search inside your notebook
Enter basil and tap Ask about my notebook.
Find matching passages across saved notes, then open a result to see it in context. Available search and AI options depend on your device.
View screenshot 38 ↗ - Revisit saved originals
Open More tools → Saved originals.
Saved originals appear here after supported writing changes. An empty list means there are no saved originals yet. Keep an external notebook backup as well.
View screenshot 39 ↗
Dates and calculations
- Write a calculation
With Inline calculations enabled, enter an expression such as 12 + 8 in normal note text. Wait for the small equals action.
Write a simple calculation. The small equals action opens a result you can review before inserting.
View screenshot 40 ↗ - Review the answer
Tap the inline equals action. Review 12 + 8 = 20.
Notenity shows the result separately so you can check it. Insert the result after the expression, copy it, or close the preview.
View screenshot 41 ↗ - Insert the result
Choose Insert result after expression.
The reviewed answer is now part of the note: twelve plus eight equals twenty.
View screenshot 42 ↗ - Add the date and time
Place the cursor in normal note text, then choose Insert → Date & time.
Insert the current date and time where you are writing. It becomes ordinary text in the note.
View screenshot 43 ↗ - Prepare a link
Select text or position the cursor, then open Format → link. Enter the destination.
Add a website, email or telephone link from the formatting controls. Check the destination before tapping Done.
View screenshot 44 ↗ - Prepare a reminder
Choose Insert → Create a reminder. Enter a short message, then select the intended date and time.
Write a reminder, check the date, time and time zone, then use Confirm and schedule when you are ready. Notification permission is requested if needed.
View screenshot 45 ↗ - View reminders
Open Tools → Reminders. Add a reminder from Insert or from dates in your note.
This screen lists reminders saved on this device. Notification permission is requested when you confirm and schedule a reminder.
View screenshot 46 ↗ - Prepare a calendar event
Choose Insert → Add calendar event. Enter a title and review the date and time.
Prepare the event in Notenity, then open the system calendar editor to review it before saving. Your calendar provider may sync the saved event.
View screenshot 47 ↗
Share and protect
- Choose an export format
Open More options → Export this page.
Export plain text, a formatted HTML page, or open Print to save a PDF. Review what you are sharing before choosing a destination.
View screenshot 48 ↗ - Preview a printable page
Choose Print / save PDF and inspect the preview.
Check the page preview before printing or sharing a PDF. The share button lets you choose a destination such as Files.
View screenshot 49 ↗ - Keep a notebook backup
Open Settings → Backup & data.
Back up your notebook to a file you keep outside the app. Restore notebook lets you import a saved backup; Storage and recovery provides more recovery options.
View screenshot 50 ↗ - Understand storage and recovery
Open Backup & data → Storage & recovery.
Keep an external backup before removing local files or reinstalling the app. Storage and recovery lists imported files and provides data-removal controls.
View screenshot 51 ↗
Settings and help
- Find your preferences
Open Notebook menu → Settings.
Choose appearance, writing and recording preferences, manage backups, or get help.
View screenshot 52 ↗ - Make the page comfortable
Open Settings → Appearance.
Choose your app language, light or dark appearance, paper font, text size and paper lines. System follows your device preferences.
View screenshot 53 ↗ - Choose writing suggestions
Open Settings → Writing.
Control shape-cleanup suggestions, reminder suggestions and inline calculations. Suggested dates and calculations still need your confirmation.
View screenshot 54 ↗ - Set recording preferences
Open Settings → Recording.
Choose the spoken language and whether playback starts slightly before a linked moment. Recording works independently of transcription.
View screenshot 55 ↗ - Find iOS permissions
Choose Settings → Device permissions to open the iOS settings for Notenity.
Manage the permissions available for Notenity in iOS Settings. Some controls appear only after you use the corresponding feature.
View screenshot 56 ↗ - Help with notes
Open Settings → How to use → Notes.
The built-in guide groups instructions into Notes, Create, Audio and Tools. Start with Notes for writing, formatting, saving and daily pages.
View screenshot 57 ↗ - Help with creating
Choose the Create tab in How to use.
Find instructions for tables, checklists, photos, files and drawings. To take a photo, open Insert → Camera on your iPhone or iPad.
View screenshot 58 ↗ - Help with audio
Choose the Audio tab in How to use.
Audio help explains recording, linked moments, playback and transcription. Transcript text is reviewed before you insert a copy into the note.
View screenshot 59 ↗ - Help with tools
Choose the Tools tab in How to use.
Tools help explains reminders, writing assistance, exports and backups. Use Back to return to Settings.
View screenshot 60 ↗ - Check the app version
Open Settings → About.
About shows the installed version and links to support, privacy and credits. Include the version number when you ask us for help.
View screenshot 61 ↗ - Contact support
Open Settings → Request help.
Email Dreamsnity at dreamsnity@gmail.com. Explain what happened and what you expected. You review the email before sending; notes and recordings are not attached automatically.
View screenshot 62 ↗ - Read the privacy policy
Choose Settings → Privacy policy.
The Privacy policy opens the Notenity page on dreamsnity.com. Read it for details about local notes, recordings and optional features.
View screenshot 63 ↗
Record voice notes on iPhone and iPad → Follow the focused audio guide for recording, playback, linked moments and offline transcription.
A few more
helping hands.
Photos, audio, reminders and backups—find the next step for the task you have in mind.
01Add a camera photo or an attachment
In your note, choose Insert → Camera, take the photo and choose Use Photo. You can also choose Photo library or File / document from Insert. Tap a photo to find its layout controls. If camera access is denied, open Settings → Device permissions to review access in iOS Settings.
02Record, pause and play back audio
Open a note and tap Record. If iOS asks for microphone access, choose whether to allow it. Use Pause and Resume as needed, then Stop to save. Play the saved recording from its card. Text and ink created while recording can link to that moment; choose Listen to revisit those links, and Write to edit again.
03Turn a recording into text
Open a saved recording’s More menu and choose Transcribe. Match the language to the speech: English or Arabic. Start transcription, wait for the result, then review names, numbers and punctuation before inserting a copy into your note. For text while recording, choose Record with live transcript in Record & transcribe.
04Keep a transcript when deleting audio
Insert the transcript into the note first and check that the text is there. Then open the recording’s More menu → Delete recording and read the confirmation. The inserted transcript is ordinary note text and remains when the audio is removed. Keep a backup if you may need the recording again.
05Receive a reminder
Choose Insert → Create a reminder. Enter a message and check the date, time and time zone. Choose Confirm and schedule. If iOS asks for notification access, choose whether to allow it. Review saved reminders under Tools → Reminders. If alerts do not arrive, check Notenity’s notification settings and your device’s Focus settings.
06Save a calendar event
Choose Insert → Add calendar event and enter the title, date and time. Tap Open to review the system calendar editor, then save to your chosen calendar. Your calendar provider may sync the event.
07Save a PDF or a notebook backup
Open the note’s More options → Export this page. Choose plain text, HTML, or Print / save PDF. Inspect the preview and choose a destination. For a notebook backup, open Settings → Backup & data → Back up notebook. Keep that file outside the app and check it before removing app data. A page export and a notebook backup serve different purposes.
08Use writing tools without AI help
Open Tools → Writing tools for actions such as tidying spacing, picking key sentences or finding tasks in your existing words. Review a proposal before applying it. Optional AI help has additional device, operating-system and language requirements; its availability screen explains whether it can run on your device.
09Find help or change appearance
Open Settings → How to use and choose Notes, Create, Audio or Tools. Use Back to return to Settings. Appearance lets you choose the app language, light or dark mode, paper font, text size and paper lines. On iPad, controls may use the extra space differently.
Still a little stuck?
Tell us what you were trying to do, which button you tapped and what happened. Include your device model, iOS or iPadOS version, and the Notenity version from Settings → About.
If you attach a screenshot, hide any private details first.
Email Dreamsnity ↗Opens a draft to dreamsnity@gmail.com. You choose what to send.